The exact steps I followed to reach course-market fit (including templates).

Many online courses are money machines for course creators but time-wasters for their students.
By creating my first cohort-based course last August, I wanted to do it differently. My goal wasn’t to maximize income but learning effectiveness.
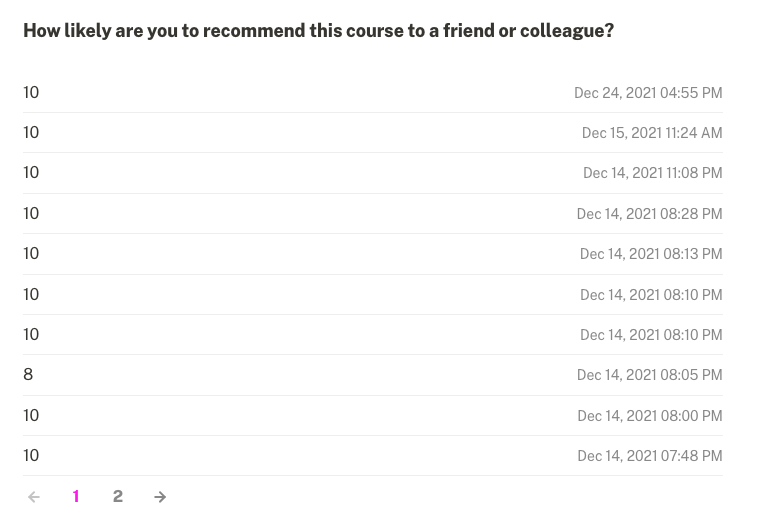
Looking at sales, net promoter score, and completion rate, I succeeded. I sold all 25 available spots, 85 per cent completed all assignments and rated the course with 9.6/10.
The following guide can help you create an online course your students will love. After a brief explainer of why cohort-based courses are the future of online learning and my prerequisites, you’ll find the exact 5 steps I followed to achieve maximum course-market fit.
Why Cohort-Based Courses…
If you went to school, you’re familiar with cohort-based learning. Students take the same lecture, assignments, and tests simultaneously.
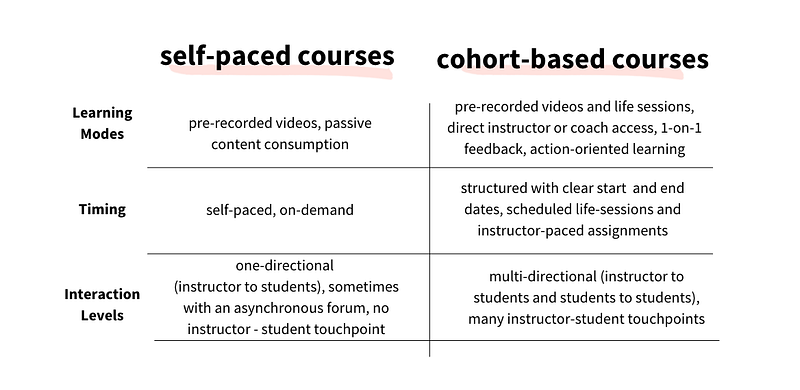
In Cohort Based Courses (CBCs), a group of people moves through the same curriculum at the same pace. CBCs often include a mix of life lessons, pre-recorded videos, remote assignments, and peer learning.
… are the Future of Online Learning
In 2011 massive open online courses, so-called MOOCs were praised for revolutionizing online learning.
But data from Harvard University and MIT revealed only three to four per cent complete self-paced MOOCs— a rate that hasn’t improved in the past six years.
On the opposite end, reports about CBCs look promising.
Seth Godin’s altMBA, a cohort-based online MBA, has a completion rate of 96%. Other CBC providers claim to have 85% of their users finish the course they started.
CBCs are designed around best practices in online learning. For example, a study found interaction with instructors affects learner retention. CBCs use online tools like Zoom or Slack to give feedback, host group coaching, or offer 1-on-1 check-ins to help students complete the course.
Don’t Compare Apples and Oranges
A friend told me he attempted to copy Ali Abdaal’s structure to make $2,000,000 on Skillshare. My friend soon gave up. He neither had the video experience nor an existing audience that followed him everywhere.
The best tutorial is useless if you compare yourself against someone too different.
Knowing where I started when I built my first course will help you determine whether and which of the below steps will help you.
- Audience. Before creating the course, I had 15,000 followers on Medium, 2,500 on LinkedIn, 10,000 podcast listeners, and 3,500 e-mail subscribers of the weekly Learn Letter.
- Teaching experience. In 2018, I completed a six-week teacher training as Teach For All fellow. I worked as a full-time Maths, Informatics, and PE teacher for two years. I hosted about 25 online workshops, and I’ve read around 30 books about how we learn.
- Additional support. I was accepted to the Maven accelerator and supported by pedagogic, marketing, and point coaches. I also contracted brilliant Eszter Brhlik for e-mail copywriting and operational support.
You can create an effective online course without the above prerequisites. But an existing audience, didactics experience, and support can make building a course easier and faster for you.
The biggest struggle most online creators have is selling their courses. This is so much easier if you have an existing newsletter subscriber base (here’s what I learned from growing my newsletter to the first 3000 subscribers).
But enough with the prerequisites — let’s get started.
1) Collect Data to Make an Informed Best Guess
I wanted to run a course on learning how to learn.
Luckily, I learned from my smart fellow writer Julia Horvath that you should first understand your customers before you build a digital product.
In my weekly newsletter, I sent out a couple of questions:
“I’m thinking about building an online course. Which topics would you like to see me cover?”
People replied with questions about how to write online.
In my next mail, I asked:
“What’s the number one biggest challenge when it comes to learning or writing?”
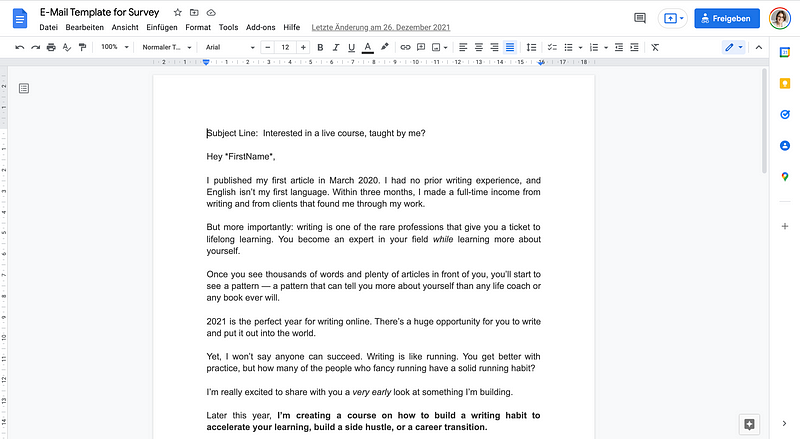
Informed by around 25 replies to these two questions, I wrote this e-mail and created this survey. 200 people replied to the survey, which helped me with the subsequent step.
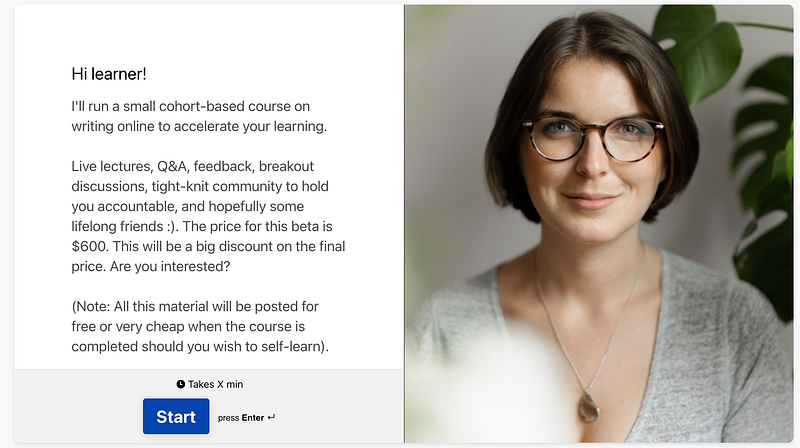
Action steps for you:
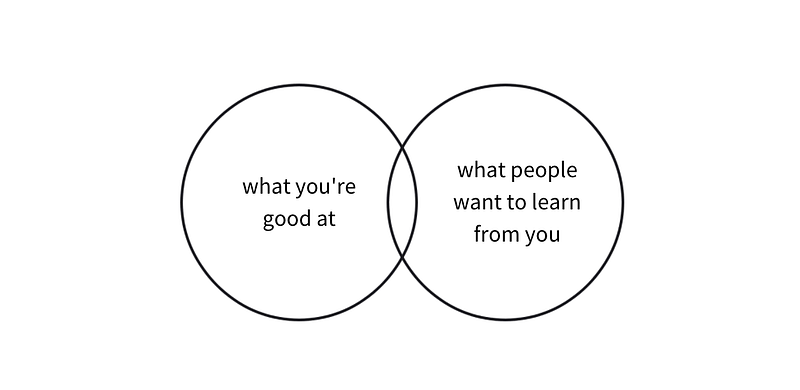
- Brainstorm 3–5 course ideas informed by what you’re good at.
- If you have an audience: Ask them what they would like to learn from you.
- Create a survey to learn more about your potential customers.
2) Find a Compelling Course Title and Scope
As a next step, I searched for the intersection between the problems people have around writing online and the problems I can and want to solve.
Narrowing the course scope can feel hard. But if you build a course for everyone, you build it for no one.
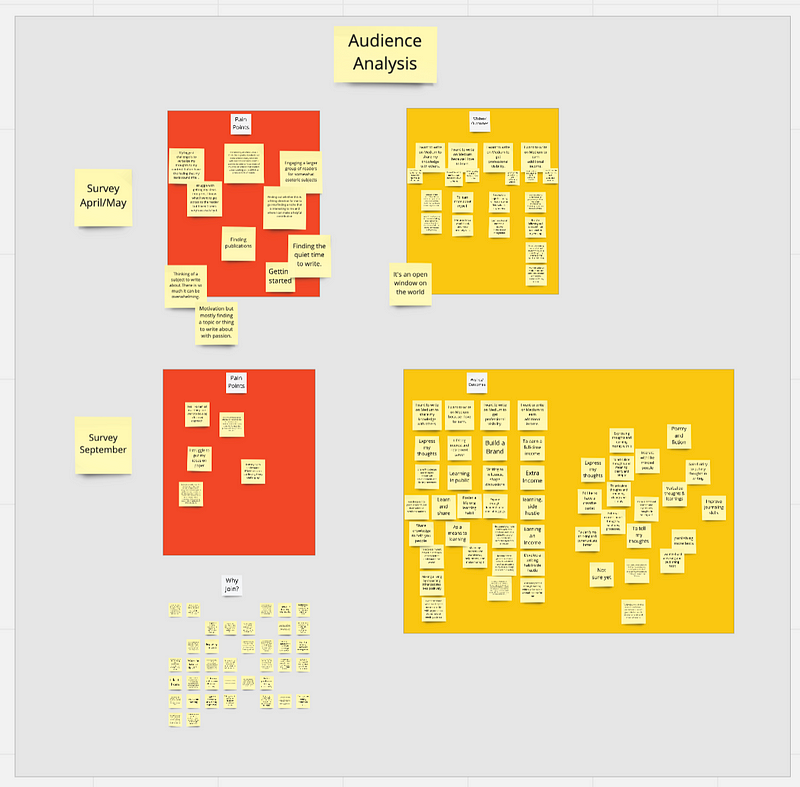
The first step I took was copying all survey responses into a visual tool such as Miro. Then, I clustered the responses. After an hour, I realized around 80 percent of the respondents shared the same four pain points.
I decided which of the pain points I wanted to solve and came up with a couple of title ideas. My first three versions for the course name were the following:
- I help beginner; occasional writers transform into consistent writers that attract a broad audience
- How to write non-fiction short-form for beginner writers who struggle with publishing consistently
- How to build an online writing habit to accelerate your learning, express your thoughts, and fuel your impact
Action steps for you:
- Analyze the data you acquired from the previous step.
- Narrow your course scope by deciding which problems you can and want to solve.
- Come up with 3–5 course titles that include whom you do the course for, what they can do based on the course, and which struggle you’re solving.
3) Test and Refine Your Course With User Interviews
Next, I sent out an e-mail to all people who answered the survey. I asked them to book a 15-minute session with my Calendly.
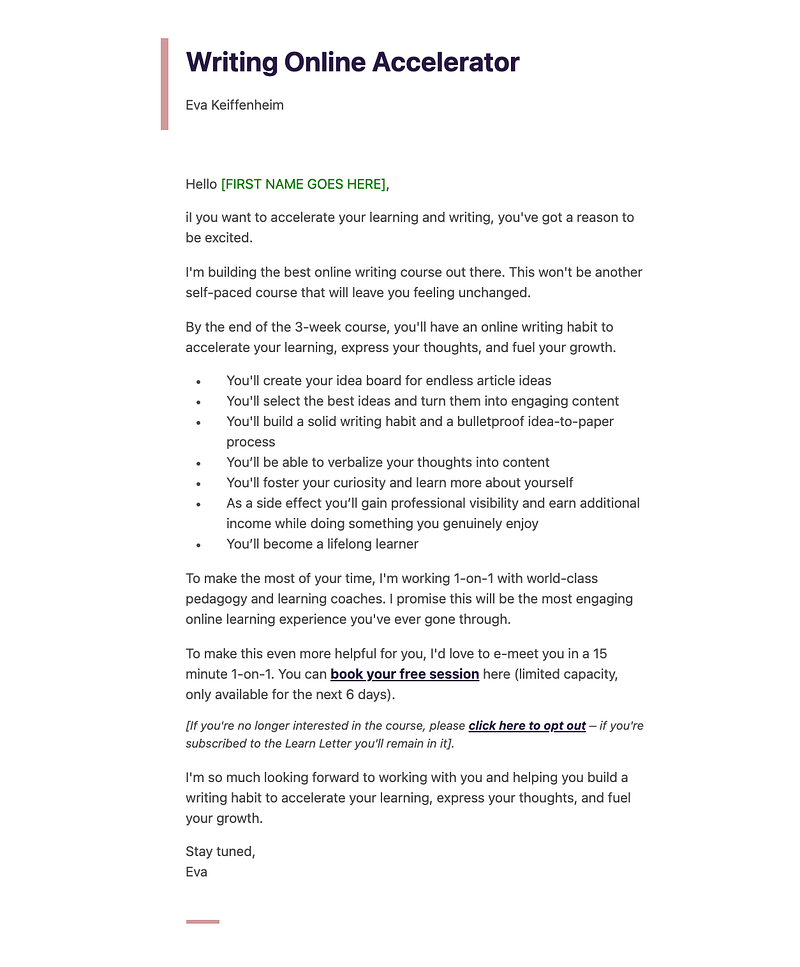
I felt a lot of resistance in sending out this mail. Until then, I communicated with my audience through writing. I was scared and curious, how Zoom calls would turn out.
After two hours, all 20 available slots were booked. The conversations were interesting and inspiring. During the sessions, I asked the following questions:
- What’s your single biggest challenge with online writing right now?
- Name 2–3 areas you are stuck in for reaching your writing goals.
- How are you currently tackling it? What have you previously tried to achieve your writing goal?
- What’s your primary goal with writing online?
- What else should I have asked?
While listening, I took a lot of notes. I organized them on a digital whiteboard.
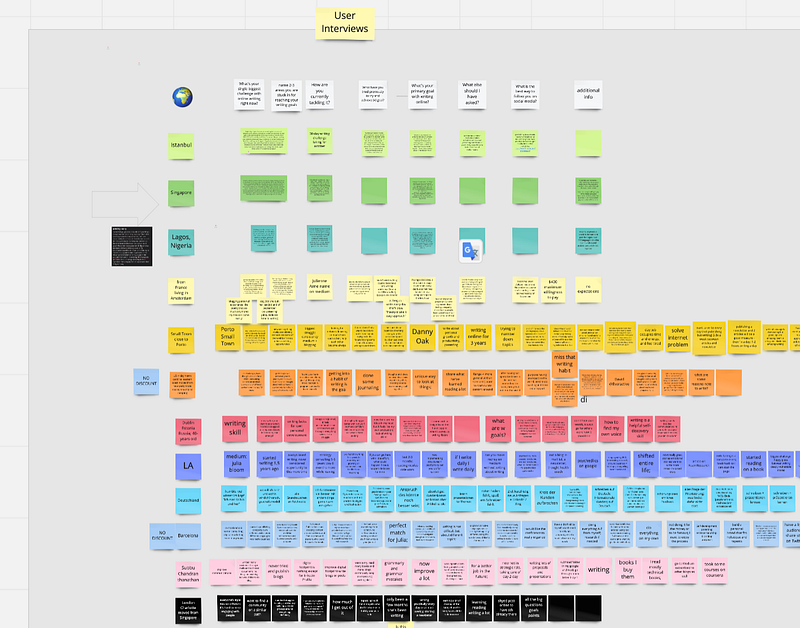
Action steps for you:
- Schedule user interviews with your potential customers
- Analyze the answers to better understand their most pressing problems.
4) Define Your Students’ Transformation
This is what many online instructors spend too little time thinking about — their students’ learning outcomes.
You want to be crystal clear on what your students should be able to achieve with the help of your course.
A helpful framework is the following, suggested by Wes: “By the end of the course, you’ll be able to do X without Y (usual blocker or friction).”
You can replace the verb “do” with anything from blooms taxonomy:
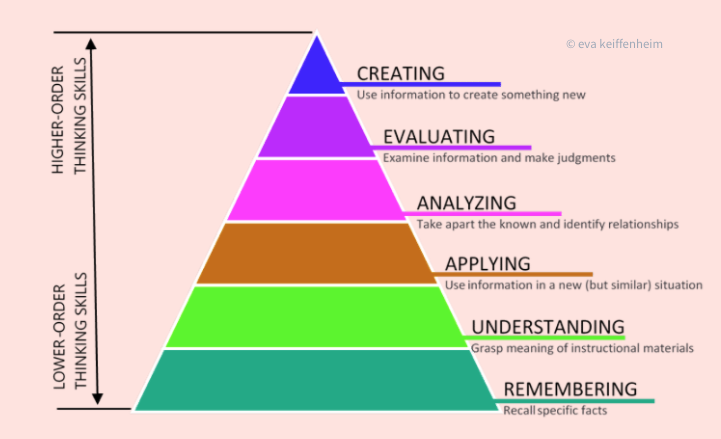
To set the learning outcome, think again about what people told you in the user survey combined with what you know about the topic you’re teaching.
Here are the key learning outcomes I defined:
- Publishing three high-quality articles within three weeks during the course (and overcoming any mindsets that have held them back before).
- Discovering, learning, and using the tools that help them with their creative workflow (e.g. for knowledge management and editing).
- Learning how to use the data they will generate (reading time, views, clicks) to make future content decisions.
- Starting an e-mail list including landing page, call-to-action, and optimized welcome e-mail that will become their most valuable asset.
- Having a repeatable and consistent idea-to-paper process that works for them long after the course.
Action steps for you:
- Informed by the previous three steps, fill the sentence, “By the end of the course, you’ll be able to do X without Y (usual blocker or friction).”
- List all learning outcomes required to make your sentence true.
5) Use Backward Design For Your Course Structure
Traditional curriculum planning uses forward design. People plan learning activities, forms of assessments and only then try to connect them to learning goals.
In backward design, you start with the learning outcome. You think about the destination your learners want to reach and plan the trip to help them get there.
This is more tricky than simply cluttering the curriculum with anything that might be relevant, but it’s far more intentional and effective.
Two questions that led my thinking was: “Which activities would students need to practice to achieve the desired learning outcome?” and “Which input is required so they can best complete this activity?”
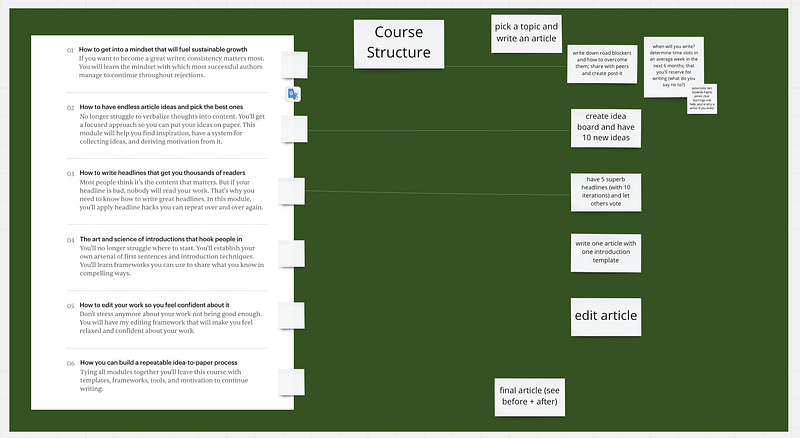
Only once I was happy with the backwards-designed curriculum, started to collect content and resources.
The result were action-oriented sessions that focused on the “how” instead of the why and what:
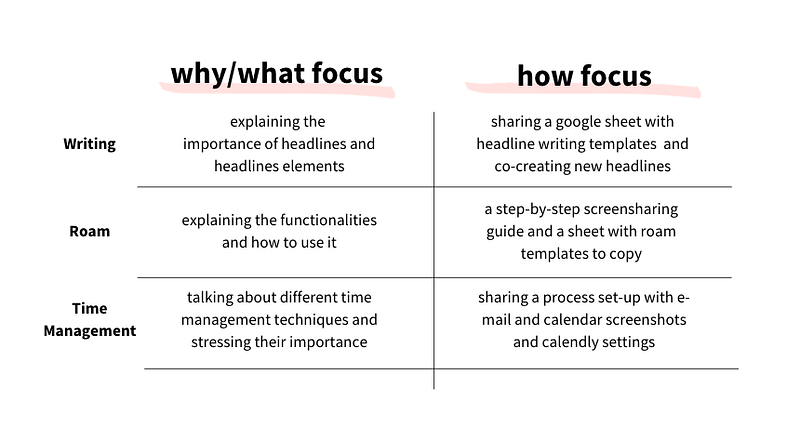
Action steps for you:
- Consider the learning outcomes and the necessary practice for achieving them prior to considering how to teach the content.
- Design the lessons around action orientation. Provide guided exercises, templates, and step-by-step guides to help your students succeed.
In Conclusion
While getting here can seem tiring, and like a lot of work, the effort is worth every minute. The five steps help you get very specific about the learning design required to help your students succeed:
- Collect data to find out what people want to learn from you
- Set a compelling course title and scope
- Speak to potential users to further refine your course content
- Be clear about your student’s transformation
- Plan your course structure with backward-design
Building this course has been one of the most rewarding learning experiences of my life (apart from teaching kids at a school). I hope you will find similar enjoyment in building a course your student will love.