Let’s get this clear: Your writing won’t bring you money because of these tools.
Sitting down to write will make your writing better. With quantity comes quality, my writing coach continues used to say. And she was right.
I wrote my first Medium article on March 27. Since then, I have published 55 pieces with a >80% curation rate. In August, I earned $4,167 on Medium alone.

And while these tools won’t turn you into a professional writer, they will level up your writing process.
Whether you’re struggling with headlines, keeping a writing routine, or are non-native speakers, these priceless tools will help.
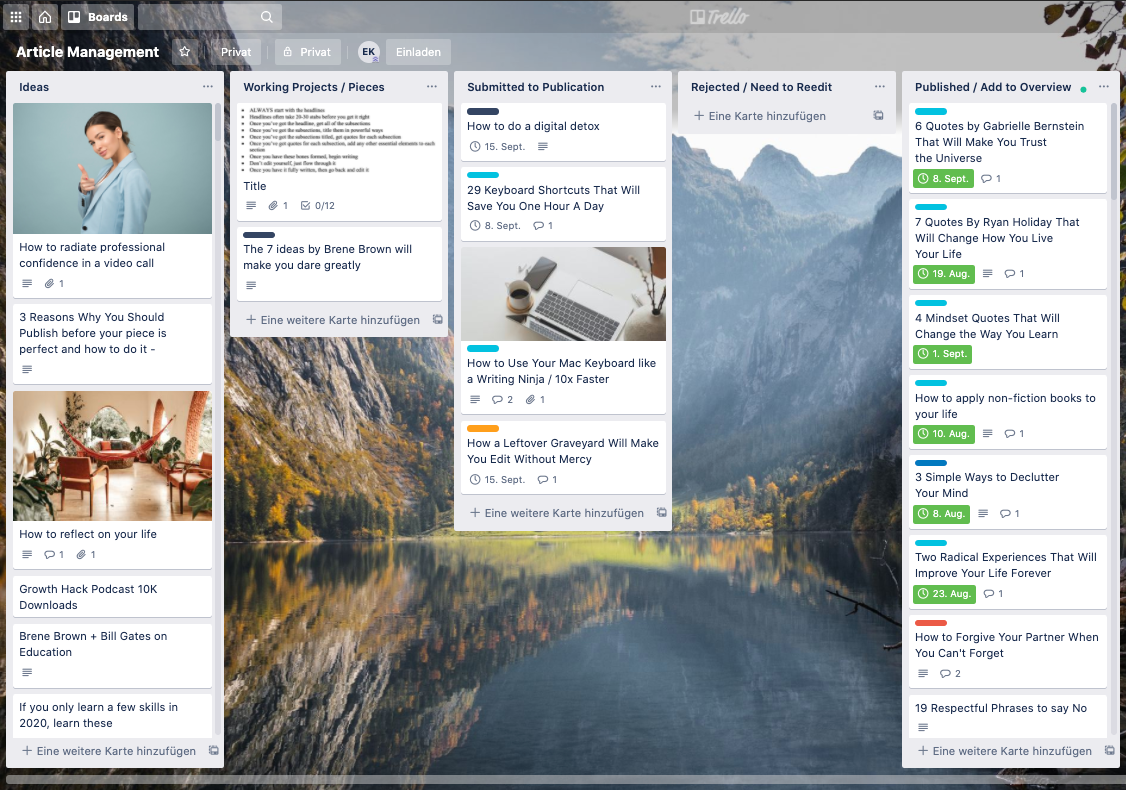
1 Manage Your Articles With Trello
Trello is an idea keeper, a writing tracker, and a motivation booster. Here’s how I use my Trello Board, from left to right:
- Medium Article Ideas
- Working Projects
- Articles Submitted to Publications
- Articles Rejected by Publications that need Reediting
- Articles Published
When to use it:
Your Trello board will be useful on five occasions.
- When an idea strikes you. Add the title or the idea as a new card to your very left corner. You can also access it from mobile. Write down everything that comes to your mind.
- When you start writing. Because of all the article ideas on your board, you’ll never have to worry about a blank page in front of you. When you start a new story, pick one of your ideas, drag them to the “Working Projects” column, and start writing.
- When you hit publish. This is a motivational booster. It feels great to move a working project card to the “articles submitted” column. In the card add a date when you expect to hear back. Thereby, you’ll see when you need to follow-up or submit your piece to another publication.
- When the publication publishes or rejects your piece. Being rejected is part of every writer’s journey. Move your card to “rejected” and improve your piece. Then, give it a new shot at another publication.
- When a publication publishes your piece. Boom! You’ll move your card from “submitted to publication” to “published.”
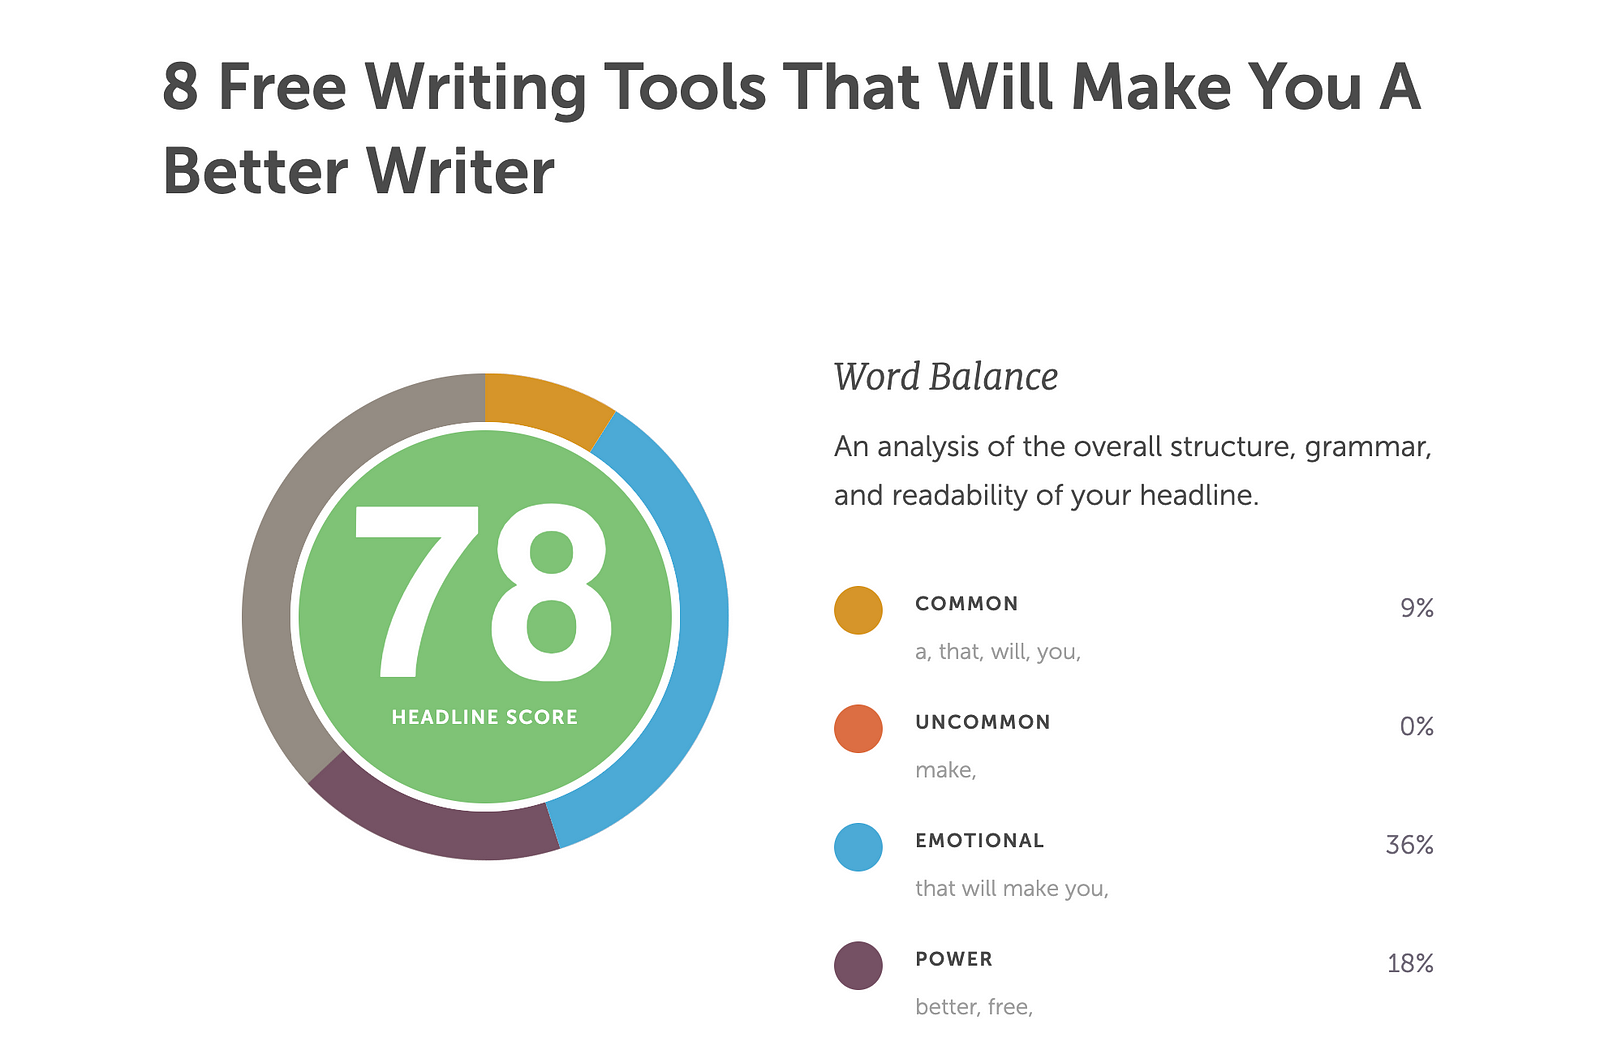
2 Improve Your Headlines with Co-Schedule
Most writers ignore this fact. They write great content and bad headlines. Yet, readers will never read your writing if your headline isn’t catchy.
Nobody will read your article if your headline sucks.
I ignored this fact until I completed Benjamin Hardy, PhD’s online course writing course. He takes 20–30 minutes every time he writes an article. He’d jot down 10–30 headlines before he starts to write.
Headline writing is a craft. It leaves the reader asking questions and wanting more.
Headlines consist of a combination of words. And while there are great articles on headline hacks, this tool does a quick check-up for you.
When to use it:
Opinions vary on this one. I love to find the headline before I start writing. It’ll help me frame my idea in various contexts. Moreover, a clear headline will help you structure the content.
3 Format Your Headlines With Title Case Converter
After you mastered the balancing act of crafting a headline that grabs the reader’s attention, you’ll want to format it. Many publications reject articles because of their first impression.
When to use it:
I use Title Case Converter before I paste the headline into my story.

4 Look Beyond Unsplash Pictures
After you’ve leveled up your writing with a great and proper formatted headline, you want to make sure you choose an awesome picture.
Search images by emotions instead of keywords. Pick a picture that supports the feeling you’re trying to convey. Tim Denning is an incredible picture picker.
When you analyze his images, you’ll see he searches beyond Medium’s built-in Unsplash feature. Here’s a list of links to free high-quality stock images:
When to use it:
After you set and formatted the headline, and before you start writing.
5 Use A Leftover Graveyard To Edit Without Mercy
Excellent writing requires ruthless editing. A leftover graveyard is a simple tool for producing clear, dense, and solid writing.
It’s a simple text document containing every phrase that wasn’t good enough to remain in your piece but was too beautiful to be deleted.
With every passage, ask yourself: Does this add value for the reader?
If the answer is yes, keep what you wrote. If the answer is nay, move sections or words to your graveyard. Every time you doubt whether you should delete a sentence, cut the sentence out, and paste it into your leftover document.
When to use it:
When you do the editing after you’ve written your article.

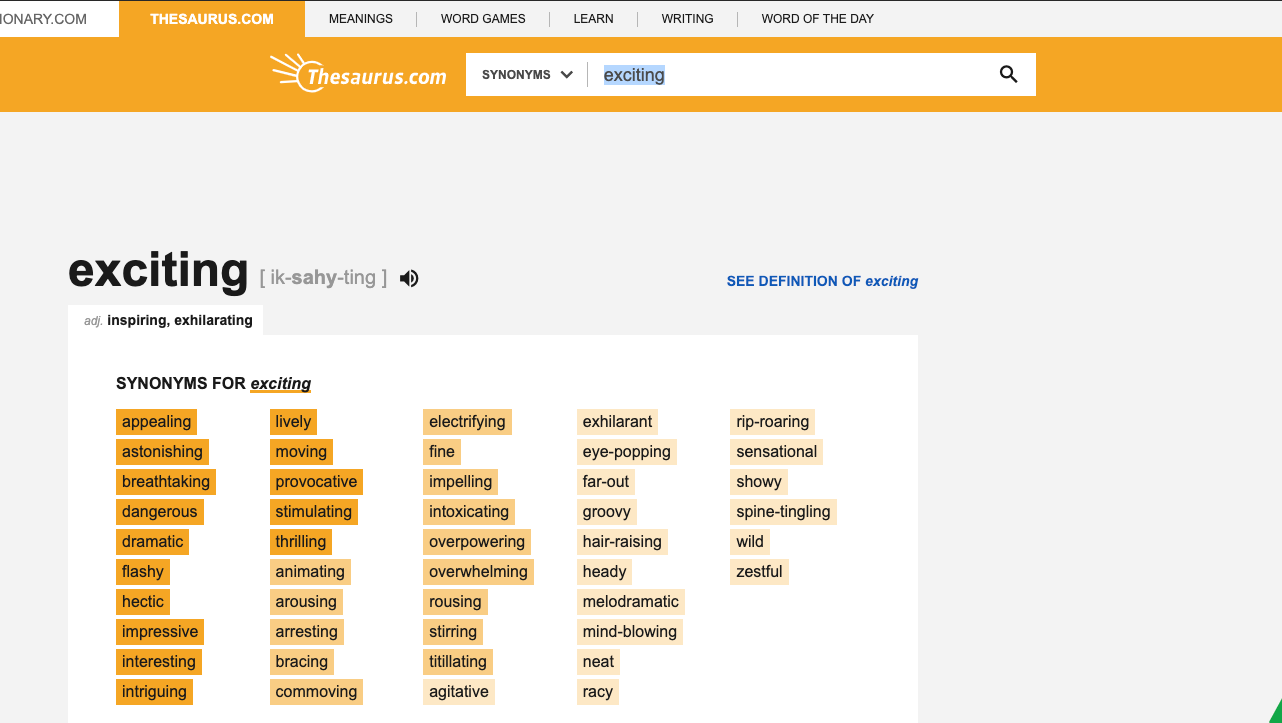
6 Engage Your Reader With Thesaurus
If you’re also a non-native English speaker, a synonym finder is a pure piece of gold. It’ll find words outside of your vocabulary and give you suggestions on how to use them.
By adding variety to your writing, you’ll make your texts more interesting.
When to use it:
I use it at the same time as the leftover graveyard. In my first round of editing, I’d cut out everything that’s not needed and look for words that make the writing better.
7 Run a Health Check With Grammarly
Grammarly has gained a lot of popularity within the last year. And it’s well-deserved. This writing tool checks your writing for grammar and punctuation mistakes.
And, in the pro-version, it also offers suggestions on how to replace your words.
Yet, don’t let Grammarly ruin your copy. It’ll sometimes be very strict on suggestions and make you want to reach the 99, even though a 78 score might be more authentic and humane.
When to use it:
To ensure it’ll not change your message, only use it after your round of self-editing. A grammar health check will give your piece the final touch.
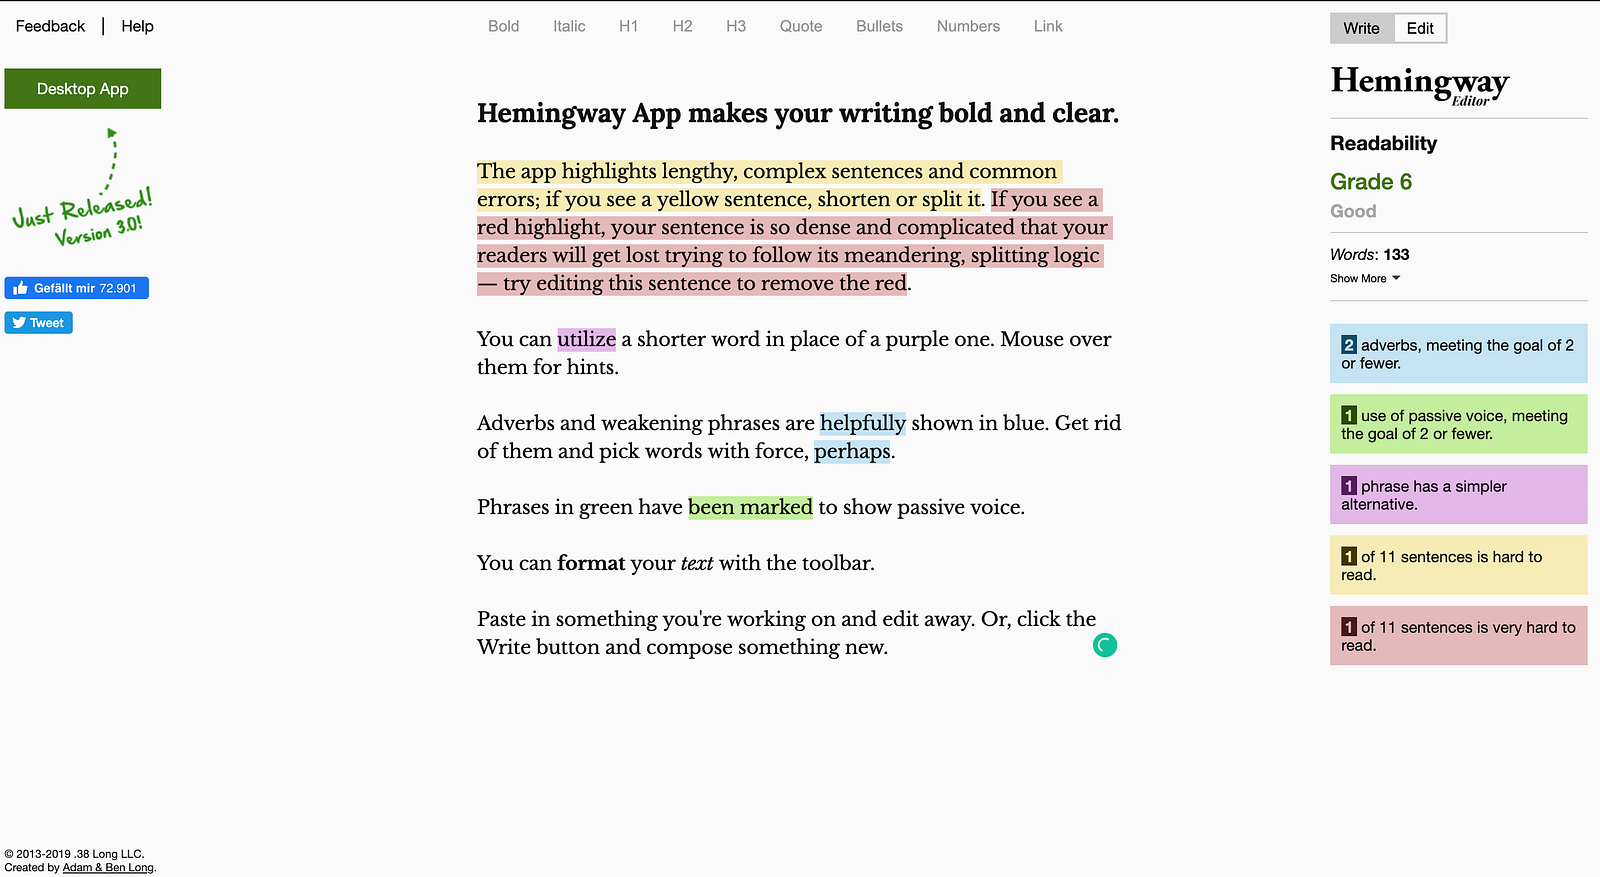
8 Do A Second Audit With The Hemmingway App
Even though I love Grammarly, it’s not perfect. So anytime I submit a piece, I’d make it run through the Hemingway App and look for phrases that are very hard to read.
Most of the times, the very hard to read phrases contain some logical errors. I’ll try to split them into two sentences or change the overall structure.
By focusing on clear, logical writing throughout your entire article, you’ll attract more readers, and, after all, take your writing to the next level.
When to use it:
After you’ve run your writing through Grammarly and before you hit publish.
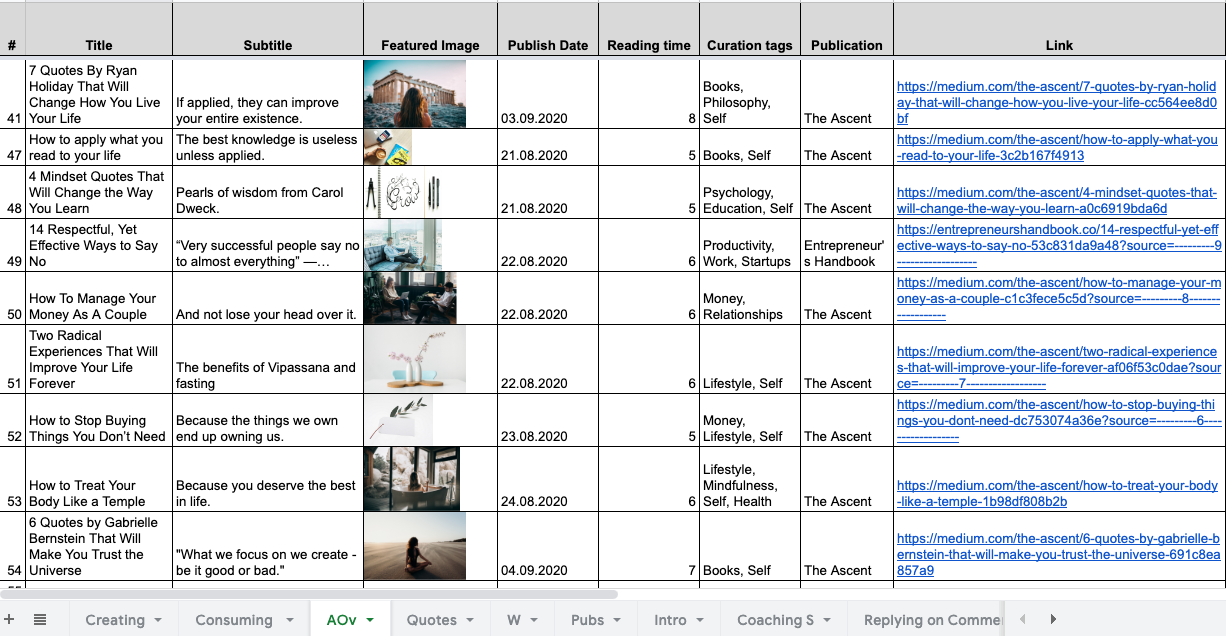
9 Analyze Your Articles With an Excel Sheet
I first learned about this sheet in Sinem’s Medium Writing Academy. It’s a self-made excel sheet you can use after you publish your article. It serves as an analyzer and a motivator.
This sheet helps you to do more of what works well. Moreover, this system helps you keep track of the number of articles published, your curation tags, and the publications you’ve published with. You can use your sheet to set your writing KPIs.
When to use it:
Once a publication published your piece add all the details to the sheet. Once a month, add the stats and the numbers.