This 4-folder system helps you tapping your knowledge in private and business

When was the last time you couldn’t find the files you were searching for?
It’s a frustrating feeling, knowing that you have information on a specific topic, but you don’t know where to find the material.
“If you don’t have a good system for storing bad ideas, you probably don’t have one for filing good ones, either.”
— David Allen
Last week, a friend asked for scientific resources for the effects of excessive smartphone usage. Do phones cause sleep deprivation? This question rang a bell as I read and saved some papers.
Before PARA, I would have spent 30 minutes searching for the documents. I would probably have found only some parts of all resources. But thanks to the PARA Method, it took me one minute to find the correct sheets in my Google Drive.
Knowledge documentation is critical as it can save you a lot of time in the long run and help you advance your professional career. Here’s how to organize your files with the PARA method so you will find everything you need within seconds.
How the PARA Method works
The PARA system is universal, flexible, actionable, outcome-orientated simple, and quick to implement. It works both with cloud services and local storage. In this article, I’ll use Google Drive as an example.
The efficiency lies in the method’s simplicity.
On the highest level in your cloud storage, you have nothing but four main folders: Projects, Areas, Resources, and Archive (=PARA).

By going through each folder step-by-step, you’ll understand where your files belong. Let’s start with the first one — projects.
1) Structure Your Projects
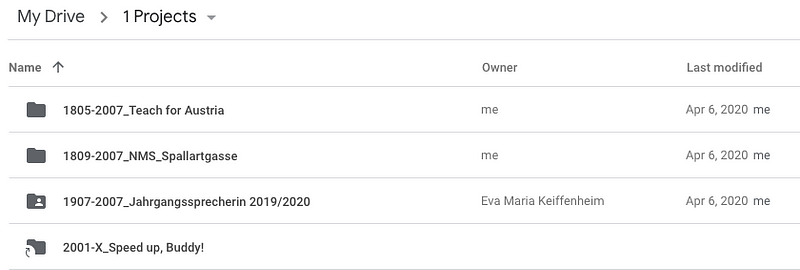
In this folder are your ongoing projects. What all of your folders in “Projects” have in common is their definite start and end date.
For each folder in the project folder, there is a clear definition of “done.” To keep a chronological overview, you label each folder with start and end dates.
Let me give you an example of how this date labeling looks like.

The numbers, like 1805 for May 2018, label start and end dates. My role as a fellow at Teach for Austria began in 1805 (May 2018) and lasts until 2007 (July 2020). Label projects with a start but no end date with an -X.
Once you finish a project, you move the folder from Projects to the last PARA folder, Archive, while extracting all helpful resources to Resources. More on that later. Before you’ll learn the magic of the Resources folder, let’s take a look at the second high-level folder, Areas.
2) Determine Your Areas
Folders in the “Area” are kind of the opposite of projects. Area folders label ongoing work without predefined end dates. You never finish “area folders” because of the work’s repetitive nature.
In your private storage, folders in your Area would be house, car, travel, hobbies, friends, product development. As a business owner, you would have a folder for employees or office management here.
In contrast to Projects, you don’t set time labels for folders within Areas.
3) Bundle Your Resources
The resources folder is your treasure. This folder is where your bundled knowledge comes together. Remember you move a done project, to the Archive?
Before you move any folder to the Archive, you go through the documents, images, and templates inside your project.
Is there any helpful resource you want to reuse in the future? These evergreen documents move to Resources instead of the Archive.
A folder within Resource is a topic of ongoing interest.
For example, typical resource folders could be project management, online marketing, SEO, productivity, or architecture.
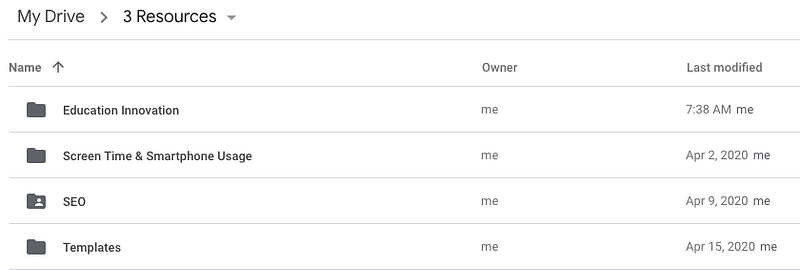
Here is a part of my private Resources folder to give you an idea.

In contrast to the projects folder, the folders within resources don’t have a start or end date. It’s your area of interest that label your folder’s name. Hence, the folders are organized by knowledge area.
For example, SEO contains all knowledge regarding search engine optimization. When an acquaintance now asks about SEO resources, I can share this folder with her.
Once you create the Resources folder, you’ll quickly realize the impact of tidy knowledge organization. This folder is a clear track record of what you learned thus far.
You can fill Resources also with documents outside of your projects. For example, if you finish an online course, move your key learnings, and templates to the resource folder.
Before you take off organizing your storage, let’s consider the last folder of the PARA method — the Archive.
4) Archive What You No Longer Need
The Archive’s concept is pretty neat. When a specific project is done, and you filtered all relevant knowledge to the resources folder, you move the Projects folder to the Archive. That’s it.
The Archive contains inactive folders from the other three categories.
Similar to the project folders, archive Folders don’t have a date description in their title. The date stamp will help you locate the knowledge you are looking for.
Reorganizing with PARA is Time Well Spent
The PARA — Projects, Areas, Resources, Archive — Method is a powerful tool to organize your knowledge.
Depending on the present quality of your file organization, the PARA implementation can take you several hours. It’s time well spent. While organizing your cloud, you will stumble upon helpful documents you weren’t aware of.
By structuring your files, you tap into your knowledge and reflect on your past learnings. In the long run, a clear knowledge organization will save you time and energy.
This article is for informational purposes only, and it should not be considered Financial or Legal Advice. Not all information will be accurate. Consult a financial professional before making any significant financial decisions.